
Ministry of Health
Labor and Delivery
Protocol
July 2015

1 | P a g e
Contents
Acronyms ................................................................................................................................................. 3
Acknowledgement ................................................................................................................................... 4
INTRODUCTION ........................................................................................................................................ 5
Infection Control .................................................................................................................................. 5
Preventing infection in clinical settings ........................................................................................... 6
High-level disinfection: ........................................................................................................................ 6
Universal precautions .......................................................................................................................... 7
Preparation of kits: .............................................................................................................................. 8
Labor: .................................................................................................................................................12
Partograph .........................................................................................................................................15
Second stage of labor ........................................................................................................................17
Third stage of labor ............................................................................................................................19
Other Procedures during Labor and Delivery ....................................................................................24
Steps in performing episiotomy ....................................................................................................24
Episiotomy and Tear Repair/Suturing............................................................................................25
Episiotomy Care: ............................................................................................................................25
Retained Placenta ..........................................................................................................................27
Procedure for manual removal of placenta ..................................................................................27
Retained placenta with closed cervix ............................................................................................29
Placenta accreta.................................................................................................................................29
Tear of Perineum, Vaginal or Cervix ..................................................................................................30
Other procedures: .........................................................................................................................30
Artificial Rupture of Membrane- only for augmentation ..............................................................31
Management of Fetal Distress .......................................................................................................32
Some possible causes of fetal distress ..........................................................................................32
Obstructed /Labor Complication .......................................................................................................33
Cord Presentation ..........................................................................................................................35
Cord Prolapse:................................................................................................................................36
Breech ............................................................................................................................................37
Shoulder Dystocia ..........................................................................................................................37

2 | P a g e
Multiple Pregnancy ........................................................................................................................38
Pre-Term ........................................................................................................................................39
Assisted Deliveries .............................................................................................................................39
Emergency Obstetric Care .................................................................................................................41
BEmONC Components ...................................................................................................................41
CEmONC Components ...................................................................................................................42

3 | P a g e
Acronyms
3TC Lamivudine
ANC Antenatal Care
ANC Antenatal Care
APGAR Appearance Pulse Grimace Activities Reflex
ARM Artificial Rupture of Membrane
ART Antiretroviral Therapy
BEmONC Basic Emergency Obstetric and Neonatal Care
BP Blood Pressure
C/S Caesarian Section
CEmONC Comprehensive Emergency Obstetric and Neonatal Care
CPD Cephalo-Pelvic Disproportion
EVF Efavirenz
FHR Fetal Heart Rate
GYN Gynecology
HIV Human Immuno-Deficiency Virus
HLD High Level Disinfection
IM Intramuscular
IUFD Intrauterine Fetal Death
IUGR Intrauterine Growth Restriction
IV intravenous
LMP Last Menstrual Period
Mg Milligram
MgSO4 Magnesium Sulfate
ml/hr mililiters/hour
Mls milliliters
MVA Manual Vacuum Aspirator
NS Normal Saline
PICT Provided Initiated Counseling and Test
R/L Ringer’s Lactate
RTI Reproductive Tract infection
SPO2 Peripheral capillary oxygen saturation
TDF Tenofovir
VE Vaginal Examination

4 | P a g e
Acknowledgement
The completion of the task to review protocols and job aides for maternal, newborn, child
and adolescent health (MNCAH) is an important accomplishment towards improving the
quality of care at health facility and community levels throughout Liberia.
The Ministry of Health (MOH) extends its deepest thanks and appreciation to members of
the Reproductive Health Technical Committee (RHTC) for their immense contributions and
commitment to ensure completion of this work.
Special recognition and appreciation go to the following institutions that were fully involved
with the development of these technical materials. They include:
1 C.B Dunbar Maternity Hospital
2. Clinton Health Access Initiative (CHAI)
3. County Health Teams
4. Relevant Program Divisions of Ministry of Health (MOH)
5. International Medical Corps
6. Jhpiego
7. Liberia Prevention of Maternal Mortality
8. Save the Children
9. United Nation Children Fund (UNICEF)
10. United Nations Population Fund (UNFPA)
11. United Nations Women (UNW)
12. World Health Organization (WHO)
Special thanks go to the H4+ Partnership for their financial support during the revision of
these crucial documents.
Health workers are strongly encouraged to use these technical materials as references and
guides at health facilities and in the community so as to improve services in maternal,
newborn, child and adolescent care.
Francis N. Kateh, MD, MHA, MPF, HFL/FLCP
Deputy Minister, Chief Medical Officer – R.L

5 | P a g e
INTRODUCTION
This protocol will address all of the essential elements of ensuring that labor and delivery
are done safely and are technically correct. The aim of the intervention outlined in this
protocol is to ensure that both mother and child survive and are healthy in an enabling and
safe environment.
(
Infection Control
This component looks into:
Initiation of the adherence of universal precaution. This applies to service provider, client,
working environment for the prevention of infection/cross infection. It includes areas of
hand washing, High Level Disinfectant (HLD)/sterility and decontamination.
Labor Room Package:
The items listed below are required for the daily cleaning up of the labor and delivery rooms
for the provision of safe and clean working environment.
• Antiseptics – Disinfectants
• Brooms (soft/hard/)
• Scrubbing brushes
• Buckets (for cleaning)
• Mop and the bucket (mopping set)
• Towels
• Heavy duty gloves
• Plastic sheets for delivery bed
• Rain boots
• Gloves – non sterile
• Sharps boxes
• Plastic container with plastic liner and foot pedals to dispose placenta
• Plastic container with plastic liner and foot pedals for medical wastes (gauze, cotton
balls, etc) (observe color coding for containers)
• One leak proof container to dispose of soiled linen
• Protective gears (Clean plastic or rubber apron and face shields, masks and goggles)
• 4 buckets with cover ( for decontamination)
• Boots (only for use in delivery room)
• Chlorine 0.5% - for surfaces and soiled materials
• Chlorine 0.05% - for handwashing
• PPE (both basic and Advanced)
• Soap bars
• Clorax (bleach)
• Sprayer
Daily routine cleaning includes:
• Using disinfectant (Chlorine – 0.05%) – for mopping of the floor and dusting of the
tables and other surfaces.
o In the delivery room (Chlorine – 0.05%) - Mop the floor and the delivery bed using
6 | P a g e
antiseptic solution after every delivery.
• Decontamination (where sterilization/autoclaving is not feasible)
• Use the three buckets for decontamination.
o First bucket with clorax (bleach)
➢ 0.5% ( the dilution of Clorax (bleach) is one part of Clorax into 9 parts of water)
o Second bucket with soapy water
o Third bucket with clean water
o Four (4) buckets should always be prepared for decontamination
• When you run out of sterile delivery kit and you have a woman to deliver, you should
decontaminate the used delivery instruments following the steps of the three buckets.
After rinsing the decontaminated instruments in the clean water in the third bucket,
take all the instruments and place them in the fourth bucket containing clean mixed
water with a fresh clorax(bleach) solution 0.5%, and leave for twenty minutes to air dry.
Take out the instruments that are now air dried and use for conducting the delivery.
The instruments are considered high level disinfected (HLD).
Preventing infection in clinical settings
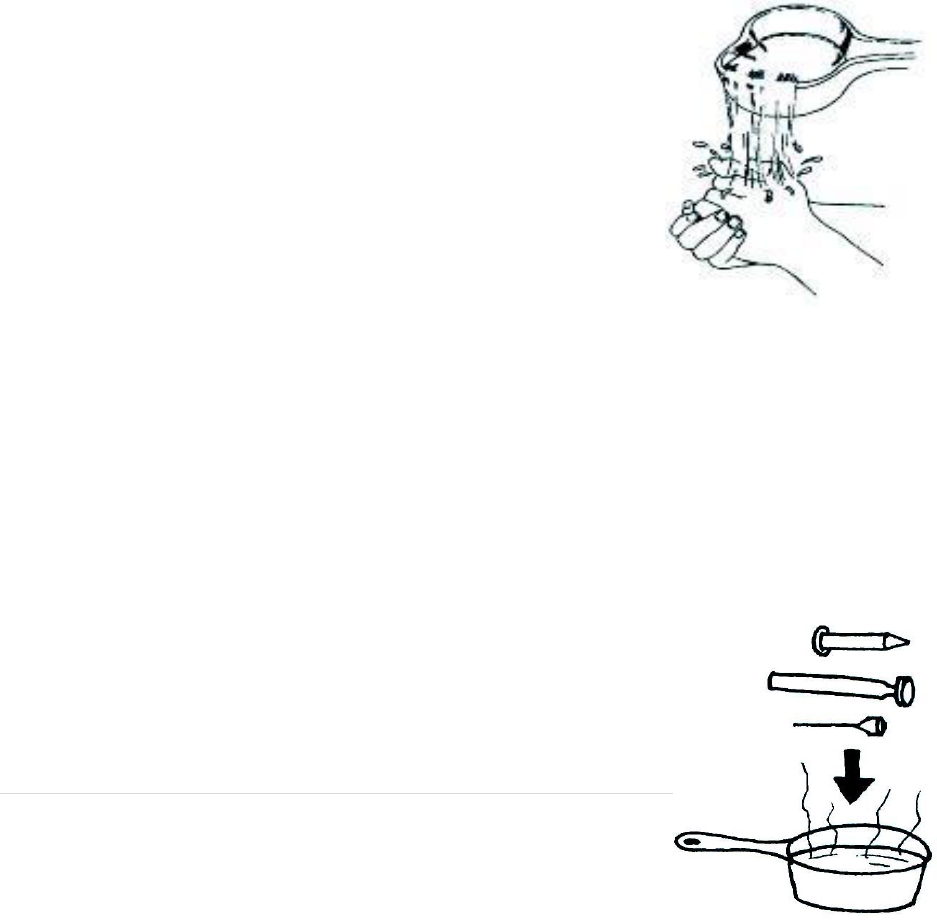
Wash your hands before and after caring for another person. It is the most important way
to kill germs on your skin. You need to wash your hands even more thoroughly and for a
longer time:
• before and after helping someone give birth;
• before and after touching a wound or broken skin;
• before and after giving an injection, or cutting or piercing a
body part;
• after touching blood, urine, stool, mucus, or fluid from the
vagina;
• After removing gloves. Use soap or other disinfectant to
remove dirt and germs.
Count to 30 as you scrub your hands all over with the soapy
lather. Then rinse, using running water. Do not reuse water.
Disinfect or sterilize equipment and instruments. Cleaning instruments and equipment to
get rid of nearly all the germs is called high-level disinfection. Instruments must first be
washed and then disinfected if they are to be used to:
• cut or pierce skin;
• give an injection;
• cut the cord during childbirth;
• Examine the vagina, especially during or after childbirth, a miscarriage, or an induced
abortion.
• Perform any trans- cervical procedure.
High-level disinfection:
THREE STEPS
1. Soaking. Soak instruments for 10 minutes. If possible, use a
0.5% solution of clorax (bleach) (see below). Soaking

7 | P a g e
instruments in bleach solution will help protect you from infection when cleaning them.
Washing. Wash all instruments with soapy water and a brush until each one looks very
clean, and rinse them with clean water. Be careful not to cut yourself on sharp edges or
points. Wear gloves when washing instruments; Use heavy duty gloves.
2. Disinfecting. Steam, boil or soak instruments for 20 minutes.
• To steam them, you need a pot with a lid. The water does not need to cover the
instruments, but use enough water to keep steam coming out of the sides of the lid
for 20 minutes. Do not overload. No instruments should protrude above the rim of
the pot.
• To boil them, you do not need to fill the whole pot with water. But you should make
sure the water covers everything in the pot for the entire time. Put a lid on the pot.
• Soak instruments in 0.5% chlorine/clorax solution for 20 minutes; make sure the
instruments are completely immersed.
For both steaming and boiling, start timing the 20 minutes after the water with the
instruments has started boiling. Do not add anything new to the pot once you begin to
count.
How to make a disinfection solution of 0.5% bleach
• If the label on your clorax or bleach says:
o 2% available clorax (bleach) - use 1 part bleach to 3 parts water
o 5% available clorax (bleach) - use 1 part bleach to 9 parts water
o 10% available clorax (bleach) - use 1 part bleach to 19 parts water
o 15% available clorax (bleach) - use 1 part bleach to 29 parts water
• Mix just enough solution for one day. Do not use it again the next day. It will no longer
be strong enough to kill germs. However, it can also be used for cleaning the delivery
room and surfaces.
Universal precautions
The same precautions against spreading infection - universal precautions - should be used
with all patients whether they appear sick or well, and whether or not you know their HIV or
other infection status.
A number of infections can be spread from patient to health care provider or to other
patients if basic precautions are not followed. Hepatitis B and C viruses and HIV are
incurable infections that are easily transmitted by reuse of contaminated sharps. Because
some infections are often asymptomatic, it is not possible to know which patients have an
infection. For this reason, universal precautions should be followed for all patients
regardless of known or suspected infection status.
Use precautions with every person you see. Every time you have to cut the skin or touch
body fluids, follow the advice below. This includes any time you must give an injection,
stitch skin or tissue, help with childbirth, or examine a woman’s vagina.
If you follow these rules, there is reduced risk of spreading infection from one person to
others, or of being infected yourself.

8 | P a g e
• Avoid touching body fluids, such as blood, vomitus, stool and urine with your bare
hands.
• Do not share anything that touches blood. This includes razors, needles, any sharp
instruments that cut the skin, and toothbrushes. If you must share such things, disinfect
them before another person uses them.
• Keep wounds covered with a clean bandage or cloth.
• Use gloves to handle dirty bandages, cloths, blood, vomit, urine or stool.
• Wash your hands with 0.05% chlorine/clorax solution or soap and water after changing
dirty bedding and clothes.
• Keep bedding and clothing clean. This helps keep sick people comfortable and helps
prevent skin problems. Handle clothing or sheets stained with blood, diarrhoea or other
body fluids carefully. Separate from other laundry for washing. Soak all used laundry in
0.5% bleach solution for at least 10 minutes before washing. Dry laundry thoroughly in
the sun if possible or iron after drying.
Preparation of Delivery Kits:
All the time in the labor/delivery room you have to make sure that there are sterile
delivery trays/kits.
1. Delivery kit contents:
• 2 scissors (one for cutting the cord and another for cutting the child’s cord after
clamping/tying
• Sanitary pad
• Artery forceps/clamps (2)
• Ring or dressing forceps (2)
• Cord tie/cord clamps
• Cotton balls
• Gloves sterile/GYN
• Gauze (pieces)
• Kidney basin/ Dish
• Medium galipot
• drapes (2)
• drapes for wrapping the tray before sterilization
• Surgical tray to arrange instruments prior to sterilization
2. Episiotomy/tear Repair Kit contents
• Episiotomy scissor
• Suture scissor
• Hemostat 2 clamps
• Tissue forceps
• Dissecting forceps
• Ring/dressing forceps
• Needle holder
• Kidney dish or small surgical tray to arrange the instruments before sterilization
• Cotton wool

9 | P a g e
• Gauze (pieces)
• Bowl or medium galipot for the swabs
• Field/green sheet
• Sterile GYN and surgical gloves
• Absorbable Sutures (size 2.0, 0)
• Lidocaine (0.5/1%)
• 5ml/10ml syringe with needle
3. Speculum pack contents:
• Vaginal speculum(small medium and large sizes)
• Surgical tray
• Green draper to wrap the tray before sterilization
4. Neonatal Resuscitation Kit:
• Penguin Suction
• Delee trap
• Nasal tube for suction
• Foot suction machine
• Ampu bag
• Oxygen source
• Neonatal air way
• Warmer
• Blankets
• Socks and hats
• Timer
• Stethoscope
• Tracheal tubes
• Glove
• Etc.
5. MVA Kit
MVA Set (syringes plunger, Uterine Cannulae of different sizes (4-12) and adapter)
• speculum , small , medium and large
• Ring forceps
• Ternaculum forceps,
• Applicator stick
• Lidocaine
• 5ml syringe and needle
• Sterile gauze
NOTE 1: THERE SHOULD NEVER BE ANY VAGINAL PACKING EXCEPT FOR CERVICAL
TEAR. Put two sanitary pads OVER the vagina when referring the patient.
NOTE 2: FOR CERVICAL TEAR, COMPRESS BLEEDER WITH STERILE GAUZE OR CLEAN
SANITARY PAD. CLEARLY INDICATE THIS ON THE REFERRAL NOTE.

10 | P a g e
• Sterile gloves
• Drapes
• Swab bowl
• Povidine /Chloroxidine solution
• Uterine sound
• Hegar’s dilators
Clean the kit using the decontamination procedure (3 buckets system) and follow by
high level disinfection (HLD) and keep in a clean covered surgical tray and label name
of the kit when the decontamination took place.
6. Vacuum Extraction Set/Palm vacuum preferably)
• Manual vacuum extractor (e.g KIWI/Ventous, )
• Drapes
• Surgical tray
• Cotton wool
• Gauze pieces
These are cleaned and wrapped in two drapes and sterilized:
7. Sterile gauze sterilized in the drums
8. Sterilized cotton balls in the drums
9. Non sterile equipment and supplies
• Ambu bag
• Apron
• Baby weighing scale
• Blankets and socks
• Box of Gloves sterile, Non sterile sizes 7, 71/2, 8
• Delivery bed with leg straps
• Doppler
• Fetal scope
• Foot suction machine
• Gown
• Gynecological /Long gloves
• Gynecological solar/battery light
• Head cap
• Heat lamp
• IV stand
• Jar for forceps
• Jar for measuring urine , blood loss
• Mama and baby kit
• Masks
• Oral airway
Note: For any instrumental delivery (vacum extraction) make sure episiotomy kit
is available.

11 | P a g e
• Partograph
• Patient admission chart
• Plaster/adhesive tape
• Resuscitation table with towels for use at time of positioning the baby’s head
• Sanitary pads
• Source of light (Torch/Batteries, solar panel, generator)
• Sterile catheters in packs (straight, Foley size 12-18)
• Suture boxes of absorbable sutures (All types of absorbable)
• Table for placing the trays when performing procedure
• Tape lines
• Ultra Sound (Hospital, Health Center)
• Urine dip stick (for checking Albumin, Sugar, Ketones
• Wall Clock
• Wrist band
Other lifesaving trays:
Emergency tray (Nick named: Handy/All time Tray)
Contents:
It is a MUST to have an emergency tray prepared and situated in a well-known place
by all staff for easy reach to minimize the delays in providing timely services. Places
for positioning the tray include:
o Labor Room
o Delivery Room
o Post Partum Ward
o Neonatal Intensive Care Unit (NICU)
o Postop Recovery Room
o Emergency Room (ER)
o
DO NOT MOVE THE TRAY OUT OF DELIVERY ROOM OR ANY OF THE PLACES LISTED
ABOVE.
Indicated below are the contents of the tray.
o Adhesive tape
o Adrenaline ampoules
o Appropriate Anti-Retroviral drugs (for baby and mother- only to HIV sero-
Positive mother)
• Big surgical tray
o BP cuff,
o Butterfly/scalp vein needle
o Canula 14, 16, 18,19, 20, 21, 24 gauge
o Catheter (sterile)
o Dextrose 5%

12 | P a g e
o Dextrose 50%
o Diazepam
o drapes
• IV fluids
o IV Giving set/infusion set/TUBING
o Normal saline
o Pitocin/ergometrine ampoules/misoprostol
o Ringers lactate
o Sterile disposable syringes (2, 5, 10, 20 mls)
o Sterile needles 21g.
o Sterile surgical Gloves/sterile 7, 7
1/2
, 8
o Stethoscope
o Suture materials
o Thermometer
o Tourniquets
o Urinary bag
o Vitamin K
Eclampsia tray
o Calcium Gluconate 1 gm (antidote for mag. Sulphate toxicity)
o Magnesium Sulphate 20% and 50%;
o Intravenous I.V, (Normal Saline
o IV Cannulae (16, 18, 20 gauge)
o Tape
o Gallipot with swab
o Sterile disposable syringes for magnesium sulphate.
o Sterile water for injection
o Sterile needles
o Chart for fluid balance records
o Lidocaine 2%( to mix with magnesium Sulphate when giving IM)
o Foley Catheter
o Testing reflex hammer
o Antihypertensive
Vital signs tray (present in the labor room 24hrs a day, 7 days a week)
o BP cuff
o Stethoscope
o Thermometer oral/rectal/thermoscan
o SPO2 Monitor (Pulse oxymeter)
Labor:
Labor is divided into four stages as follows:
• First Stage
• Second Stage
• Third Stage
• Fourth Stage

13 | P a g e
First Stage of Labor
Is the onset of true labor until the cervix is fully dilated.
Procedure in admission of a woman in labor;
• Welcome the mother and family
• Take the mother to the labor room
• Reassure the woman
o Explain all what you will do
o Determine Fetal Heart Rate
o Explain the physiological process of labor
o Educate her on breathing exercise
• Ask for pregnant woman health card and go through it.
• Take complete past and present obstetric history.
• History of present labor
o When did the contraction start?
o Any discharge/leakage or any blood per vagina?
o Has she seen any clear , bloody sticky like fluid?
o Has the fore water(membranes) ruptured?
o How long does the contraction last?
o Is she on any treatment?
o Ask if she has any history or any information to share in regards to her health
(here also we are looking if she is HIV positive and willing to share).
o Review the Pregnant woman’s health card to check HIV testing and status (Code)
o Offer Provider Initiated Counseling and Testing (PICT) if never tested or tested negative
more than 3 months ago
o If she is HIV positive and already on ART:
▪ Continue the same ART regimen at regular prescribed intervals.
▪ Pregnancy / breast-feeding are not indication to change women from
any previous ART regimen.
o If she is HIV positive and not yet on ART or interrupted or stopped ART:
▪ Start lifelong TDF/3TC/EFV as soon as possible, during labor or
after delivery.
▪ Deliver individual ART counseling and IEC before discharge
Ask the woman if she has any information to share in regards to her HIV status or ask
her the type of Infant feeding option she chose during ANC and if she is still going to use
the same option. e.g if formula ask her for the formula she brought with her
• Explain to her that at the time of delivery the baby will start having feeds from THE
FORMULA. The staff will prepare the baby formula using the formula brought by the
mother. Feed the baby using spoon and cup; also staff will teach her on the
preparation of the formula feed.
Carry out physical assessment while the woman is lying on the bed
Note: obtain the treatment card from medical records

14 | P a g e
• General examination (head to toe)
o Vital signs (BP, temp, respiration, pulse) and record date and time
o Weight, Height
o Check for any signs of disability
Abdominal Examination
• Observe and Feel the contractions (mild, moderate, strong)
• Check the fetal heart rate,
• Observe for scars, fundal height/presentation/position/descent
Pelvic and Vaginal Examination (every 4 hours)
• Cervical dilation
• Membranes
• Presenting part
• Any vaginal discharge
• Descent of presenting part
• Check for promontory; if is palpable notify the doctor
• Record findings in admission and partograph notes
Start the partograph recording and monitoring when cervical dilation is 4cm
• If the cervical dilation is less than 4cm, record the findings in nurses note/patient’s
chart
Check for laboratory investigation records
Supportive care during labor:
Cleanliness
• Encourage the woman to bathe or wash the genitals at the onset of labor upon
admission, empty the bladder and rectum
• Encourage the woman to wash her hands with soap and water
• Educate the woman not to touch the vaginal/vulva (self PVE)
• Do not give enema (evidence based: Does not have any significant help in hastening
labor).
Eating and drinking
• Encourage the woman to eat and drink in small amounts.
• Nutritious eating and drinking are important – fresh juices, soup, water, etc.
Breathing techniques (this is the continuation of the exercises taught during ANC visits
for use at time of labor)
• Teach her to notice her normal breathing
Note: DO NOT SHAVE the woman before C/s. The antiseptic cleaning routinely done
before the procedure is more appropriate and is the recommended one.

15 | P a g e
Encourage her to breathe out more slowly making a sighing noise and to relax with each
breath
• If she feels dizzy, unwell, is feeling tingling (pins-and needles) in her face, hands and
feet – encourage her to breathe more slowly
• To prevent pushing at the end of first stage of labor, teach her to pant (to breathe in
with an open mouth and take 2 short breaths out)
• During delivery of the head, ask her not to push but to breathe steadily or to pant
Pain and discomfort relief during labor
• Suggest change of position
• Encourage her to walk around, as is comfortable for her
• Encourage companion to:
o Massage the woman’s back if she finds this helpful
• Hold the woman’s hand and sponge her face between contractions
Encourage her to sit on the birthing chair
• Encourage her to use the breathing technique
• Encourage warm bath or shower if available
If woman is distressed or anxious, investigate the causes (ketone breath smell, weak
and irritable, etc)
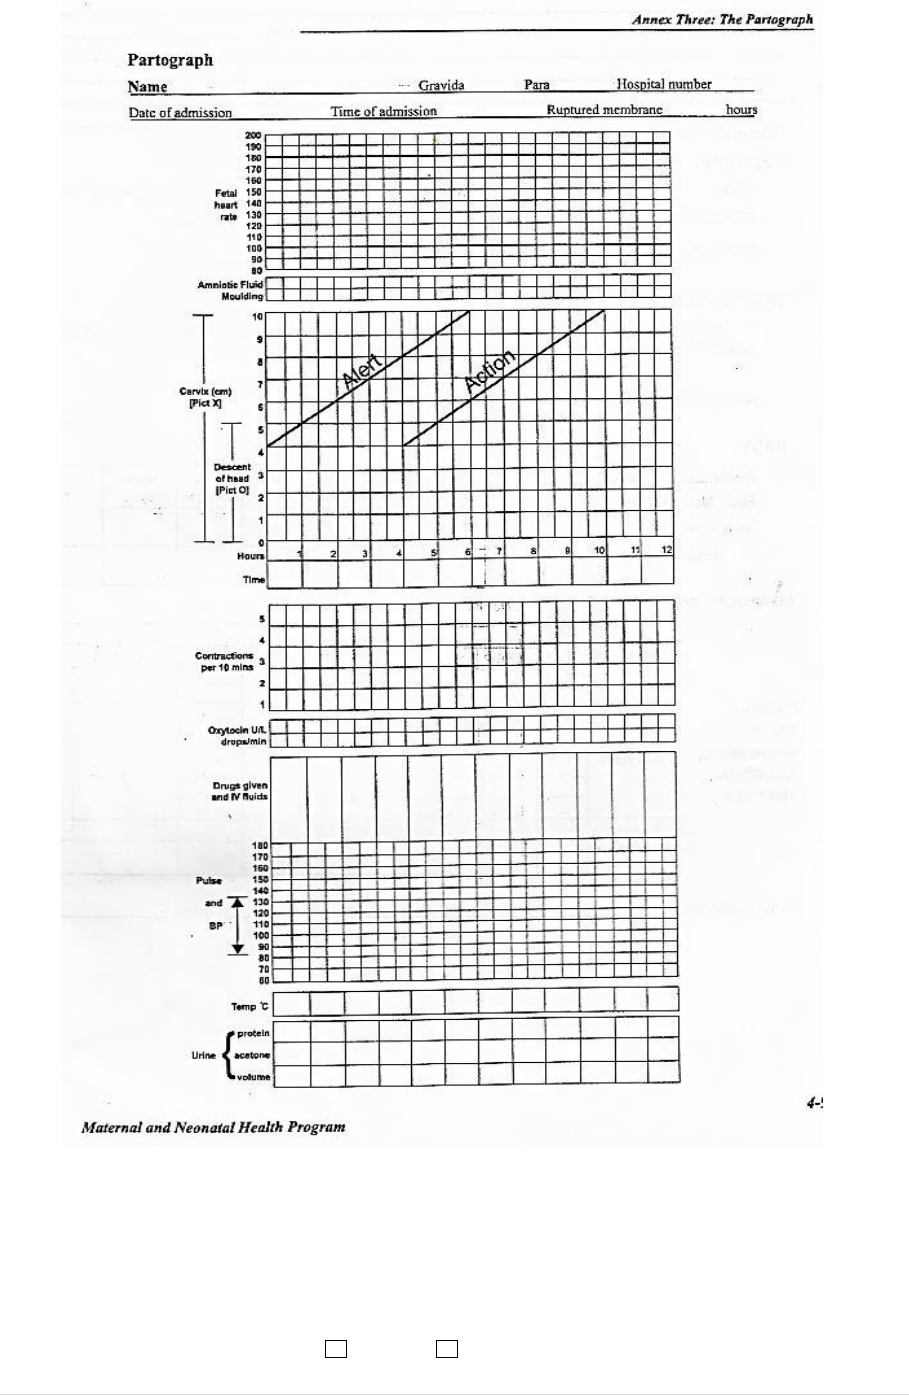
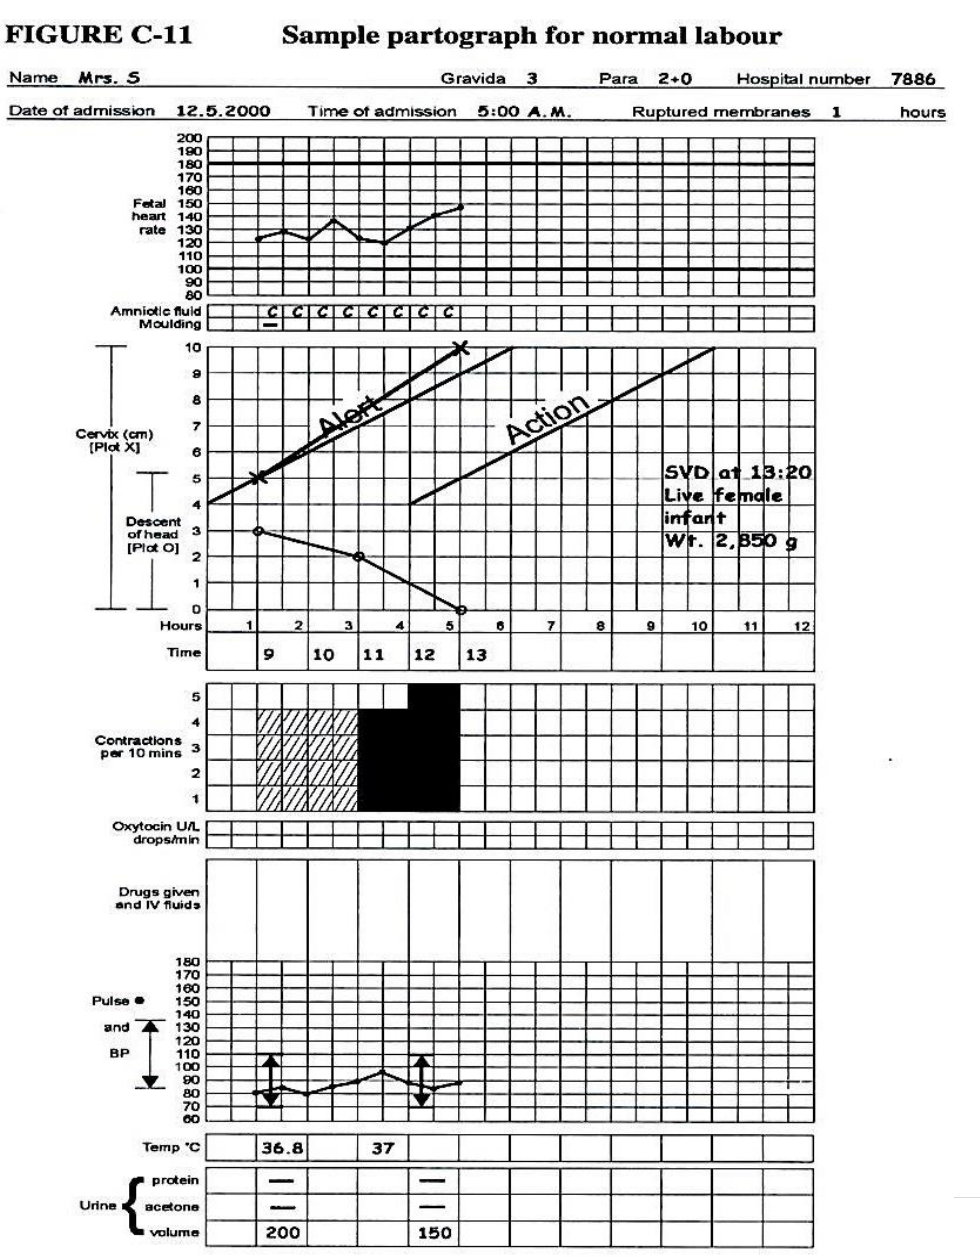
Partograph
A tool developed by WHO for use by skilled birth attendants to monitor, document and
manage progress of labor.
Parts of the Partograph
Top part
Mother’s Information:
• Name
• Gravida
• Parity
• Hospital number
• Date of admission
• Time of admission
• Time membrane ruptured
Fetal condition:
• Fetal Heart Rate (FHR)
• Descent of the presenting part, Plot with “O”
• Liquor or amniotic fluid observed and recorded
o Clear “C”
o Meconium Stained “M”
o Bloody “B”
• Membrane Intact “I”
• Membrane Absent “A”
• Moulding: The shaping of the fetal head to the size and shape of the birth canal

16 | P a g e
• “O” skull bones not touching (no moulding)
• “+” skull bones are touching (small moulding)
• “++” skull bones overlapping but can be separated (moderate moulding)
• “+++” skull bones are overlapping and can’t be separated (severe moulding)
Maternal condition and managementCervical dilation: Plot with “X”
• Contractions
The strength of the contractions can only be determined by feeling or touching the
abdomen/fundus at time of contraction as follows:
Mild: lasting less than 20 seconds
Moderate: lasting 20-40 seconds
Strong: lasting 40 seconds and above
Contractions along with cervical dilation and descent of the head indicate the progress
of labor.
Time is recorded using the time of admission as “zero time”
o Medication
o Intravenous fluid
o Oxytocin
• Blood pressure, pulse and temperature are recorded in the appropriated spaces
• Urine is recorded every time urine is passed. Note, in the case of catherization,
record the amount or quantity of urine passed also.
Note: For correctly plotted partograph:
On the line:
• FHR
• Cervical Dilatation
• Descent of the Head
• Pulse
Right side of the line (in the box):
• Time
• Liquor
• Moulding
• Contraction
• Urine
• Temperature
• Blood Pressure
Mild Moderate Strong

17 | P a g e
Second stage of labor
Is the period from full dilation of cervix until delivery of the baby.
Make sure the baby’s head has crowned
Ask the mother to bear down, encourage her to continue until the head is delivered. While
supporting the perineum, deliver the head and wipe the face.
• Suction mouth, then nose only if necessary
• Wait for the turn of the head (restitution) to take its natural time,
• Check for cord around the neck:
o If loose, slip the cord over the head
o If tight or multiple, apply two clamps and cut between them
• If no cord, place the baby’s head between your two palms and instruct the mother to
breathe in and out
• Slightly and gently, pull the head down for the delivery of anterior shoulder as the
mother pushes
• Deliver the posterior shoulder by gently lifting the head upward
• Clamp and cut the cord
• Then deliver the rest of the body
o Usually, delivery of the rest of body proceeds without difficulty; otherwise apply
gentle traction
• Apply two clamps to the cord and cut between them within one minute of delivery of
baby using one of the scissors in the delivery kit.
• Dry and stimulate the infant immediately (pay attention to drying the head) and place
on the mother’s abdomen. DO NOT TURN THE BABY UPSIDE DOWN. DO NOT SLAP THE
BABY.
• Suction the mouth, then nose ONLY if necessary
• Wipe eyes and assess baby’s breathing
• Keep the baby warm and in skin-to-skin contact on the mother’s chest. Wrap the baby in
a soft, dry cloth, cover with a blanket; Apply Tetracycline eye ointment to the eyes.
• Assess the baby for any abnormalities and if none found, initiate
immediate breast feeding.
• Depending on the feeding option chosen by the HIV Positive mother
during ANC:
o IF the mother chose breast feeding put the baby on the breast to feed immediately
o IF the mother chose formula feeding prepare the formula the mother brought with
her and feed the baby within one hour of delivery
Note: IF there is difficulty delivering the shoulder, which can lead to restitution not
taking place, suspect shoulder dystocia. DO NOT FORCE OR PULL THE HEAD. (Refer to
procedure for shoulder dystocia).
18 | P a g e
Back of partograph form
Labor notes
• Delivery time, date, method,
• Oxytocin: amount, time and the route of administration
• Perineum: intact, episiotomy, laceration
o Repaired? Yes No

19 | P a g e
Third stage of labor
It is the period after delivery of the baby until delivery of the placenta
• Palpate the abdomen to rule out the presence of an additional baby before proceeding
with active management of third stage of labor (giving oxytocin)
o This method prevents postpartum hemorrhage
Steps for active management of the third stage of labor:
o Give immediate oxytocin 10 units IM after delivery of the baby – assistant can help.
In case there is no oxytocin, give ergometrine 0.2mg IM or, Misoprostol 600mcg P.O.
o Apply controlled cord traction upon evidence of a contraction after administering
oxytocin.
Note: DO NOT GIVE ERGOMETRINE IF THE WOMAN HAS HIGH BLOOD PRESSURE
OR HEART DISEASE.
DO NOT ADMINISTER ERGOMETRINE BEFORE THE PLACENTA IS DELIVERED.
• After IM oxytocin, wait for the strong uterine contraction (usually 2-3 minutes).
Meanwhile, clamp the cord closer to the perineum
• Deliver placenta by controlled cord traction, hold the clamped cord and the end of
forceps with one hand (most of the time with the dominant hand)
• Place the side of one hand (dominant hand) above the woman’s symphysis pubis (with
the palm facing towards mothers’ umbilical cord)
• Stabilize the uterus by applying counter-traction during controlled cord traction. (This
helps prevent inversion of the uterus) At the same time apply steady, sustained
controlled cord traction
• Pull downward gently on the cord to deliver the placenta
• If you follow the above steps, and placenta does not descend or deliver during the 30-40
seconds of controlled cord traction, do not continue to pull on the cord.
THEN:
o Gently hold the cord and wait until when the uterus is well contracted again
Apply active management of the third stage of labor (active delivery of the
placenta, Brandt Andrews method of delivery)
For the application of controlled cord traction method for the delivery of placenta, do
not wait for the signs of placental separation eg. gush of blood, or lengthening of the
cord.
Note: if necessary, use a sponge forceps to clamp the cord closer to the
perineum as the cord lengthens (or gets longer)
cord
20 | P a g e
THEN:
o The next contraction you repeat the steps for controlled cord traction with counter
traction
o As the placenta delivers or comes out, catch and hold in both hands (to prevent tearing
of the membranes)
o If the membranes do not come or slip out spontaneously then:
o Gently twist and move them up and down to assist separation without tearing until
placenta is completely delivered.
o Gently massage the fundus to help contraction
Look carefully at the placenta to be sure none of the parts is missing and is complete:
amnion, chorion, and lobes.
IF
A portion of the placenta is missing or there are torn membranes with vessels, suspect
retained placenta fragments then refer to Manual Removal of Retained Placenta or Products
of Conception
• Check that the uterus is well contracted and there is no heavy bleeding.
• Examine perineum, lower vagina and vulva for tears
• Record blood loss through third stage and immediately afterward
• Clean the woman and the area beneath her. Put sanitary pad under her buttocks to
collect blood (help her to change clothes if necessary)
• Keep the mother and baby in delivery room for a minimum of one hour after delivery of
placenta
• Dispose placenta in the correct safe and culturally appropriate manner
• Put the baby on the mothers’ breast
Third stage of labor information to be included in partograph notes
• Was active management performed? Yes No
• Medication given
• Condition of Placenta
• Amount of blood loss
Never apply cord traction (pull) without applying counter traction (push) above the
symphysis pubis with the other hand
cord
REPEAT CHECK AFTER EVERY FIVE (5) MINUTES.
NOTE: PROPER ACTIVE MANAGEMENT OF THIRD STAGE OF LABOR REDUCES PPH,
A MAJOR CONTRIBUTING FACTOR TO MATERNAL MORTALITY

21 | P a g e
Fourth Stage monitoring for mother and baby
• Is the period just after delivery of the placenta to 2-7 hours following delivery
• Continue to monitor the mother and baby closely
o Every 15 minutes for the first 2 hours
o Every 30 minutes for next one hour
o Hourly for 4 hours
Baby
o APGAR Score refers to Appearance, Pulse, Grimace, Activities, and Reflex of the
baby. It should be taken at 1 minute, 5 minutes and 10 minutes after birth. Each sign
of the APGAR Score is scaled between 0 – 2:
• A score of 7 – 10 is considered normal;
• A score of 4 – 7 might require some resuscitative measures;
• A score of 3 and below requires immediate resuscitation.
Indicate action taken after each period of recording the APGAR Score.
o Weight
o Length
o Presentation
o Sex
Note: Include all complications of mother and baby (if any)
MONITORING:
ALL MOTHERS AND BABIES MUST BE MONITORED EVERY 15 MINUTES FOR THE FIRST 2
HOURS THEN EVERY 30 MINUTES FOR 1 HOUR AND THEN EVERY 4 HOURLY UNTIL
AFTER 24 HOURS.
Birth attendant’s Name: _______________________________________
Date:_______________________________________________________

22 | P a g e
23 | P a g e
Neonatal Care
• Assign an APGAR score at one and five minutes of life
• If any signs of distress, CALL FOR HELP and refer to Neonatal Resuscitation Guidelines
o AGPAR at one minute less than 4
o Respiratory rate less than 20 breaths per minute
o Respiratory distress
o Heart rate less than 100 beats per minute
24 | P a g e
Other Procedures during Labor and Delivery
EPISIOTOMY
• This is a small incision made in the perineum only when necessary. This incision is
only performed by the skilled health worker once there are indications of
instrumental delivery, complications and/or conditions hindering delivery of the
baby such as:
• Scarring
• Keloid
• Shoulder dystocia
• Previous third degree tear
• Fetal distress
• Premature delivery
• Threatened tear
• Breech (buttock)
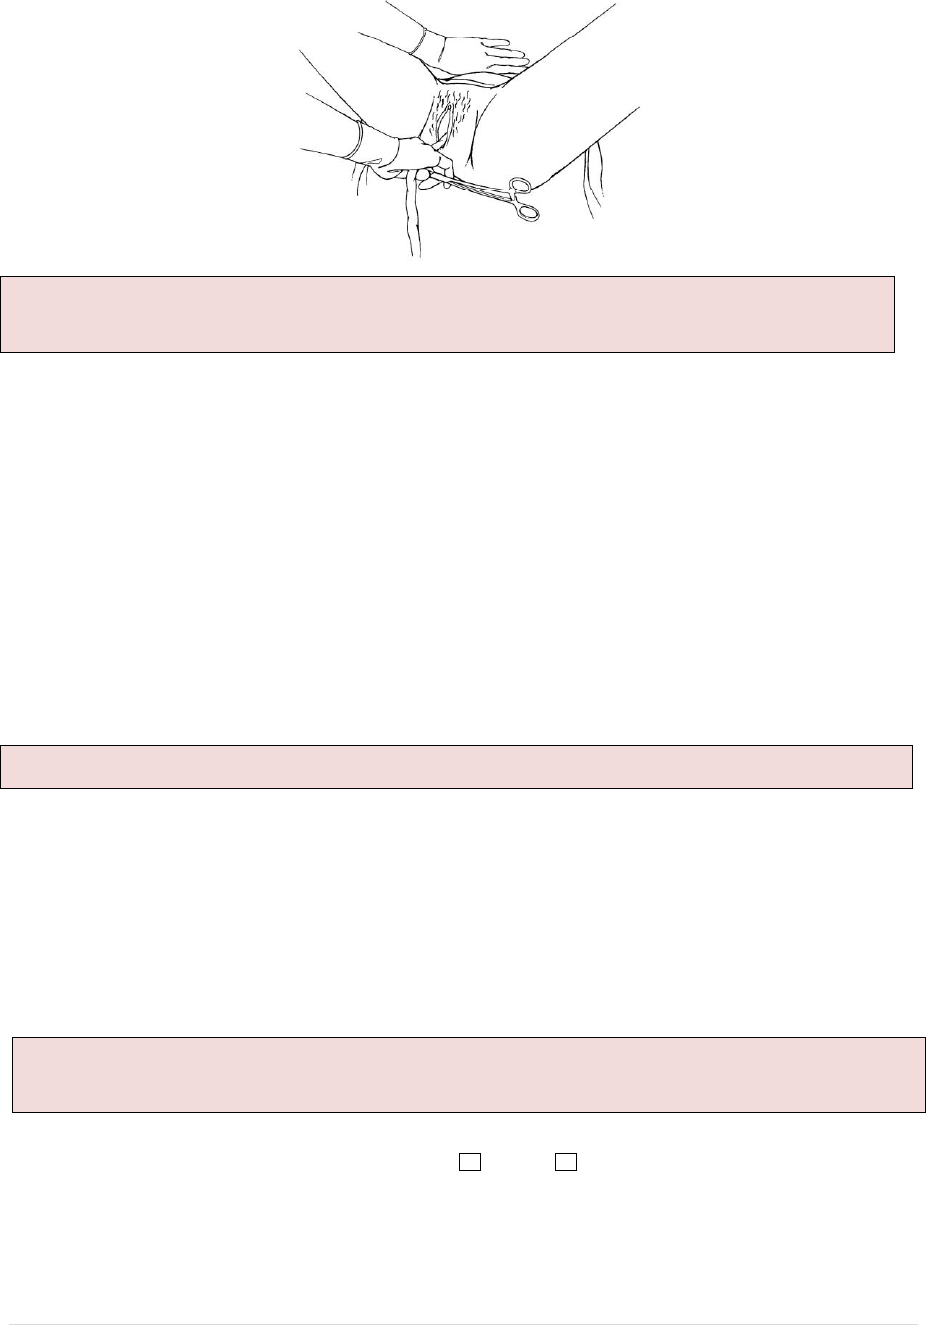
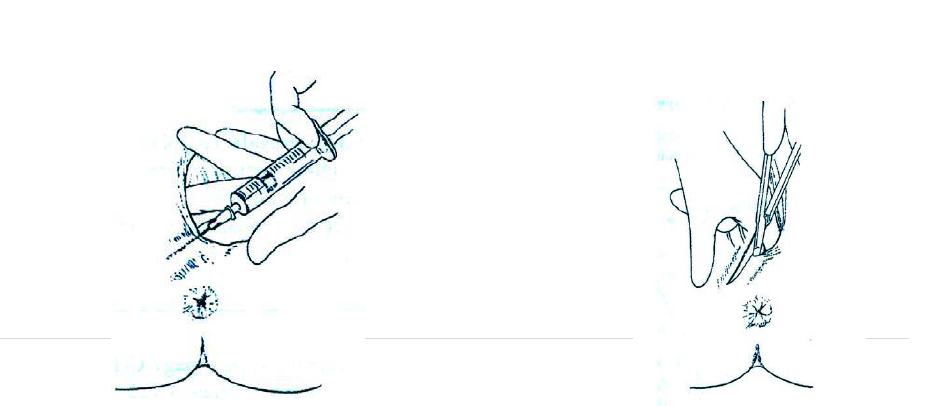
Steps in performing episiotomy
Explain to the mother the reason for performing the episiotomy and procedures.
• Prepare local anesthesia – 10ml of plain lidocaine 0.5%-1%
• Insert the needle beneath the vaginal mucosa beneath the skin of the perineum and
deeply in the perineum muscle (MAKE SURE YOU USE A REGULAR DISPOSABLE
SYRINGE AND NOT THE AD SYRINGE
• Aspirate – pull back the plunger to check for any blood in syringe – if there is blood,
pull out the syringe and needle and draw a new dose; if there is no blood in the
syringe, infiltrate the local anesthesia.
• When the woman is having urge to bear down, encourage her to push when having
contraction and watch for the thinning of the perineum muscles as it stretches and
the crowning of baby head is taking place.
• Support the perineum using a sterile pad.
• Insert your two fingers (index and middle) inside the vagina between baby’s head
and the perineum
• Insert the episiotomy scissor with blunt edge inside vagina between the two fingers
• With strong contraction as the woman bears down make a lateral deep straight cut
(once)
• Place the episiotomy scissor in the delivery kit
Infiltration of perineal tissue with
local anaesthetic
Making the incision while inserting
two fingers to protect the baby’s head
25 | P a g e
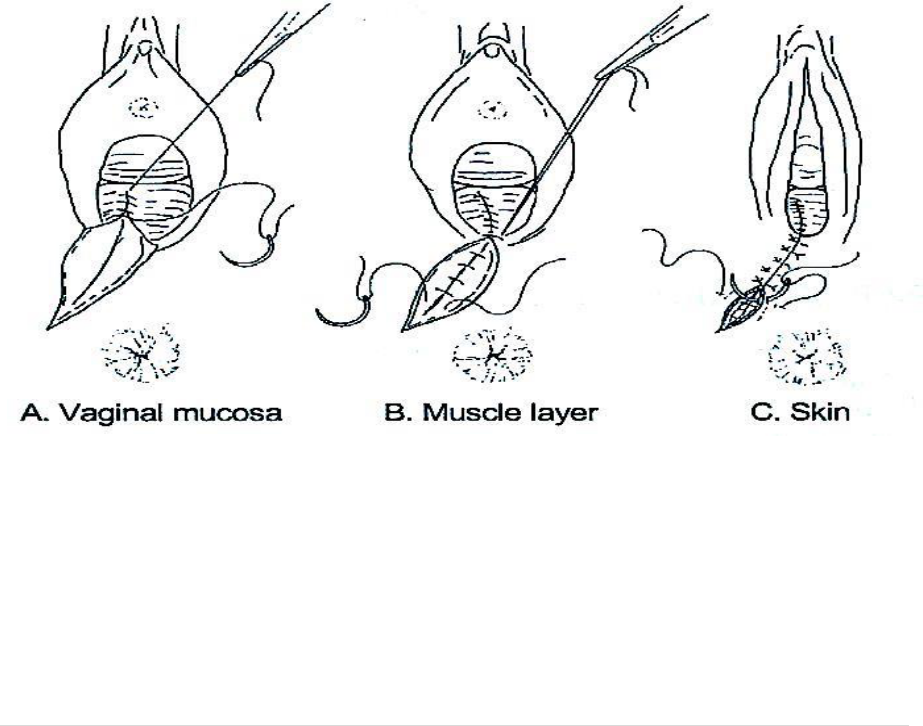
Episiotomy and Tear Repair/Suturing
• Explain the procedure to the woman for her understanding and cooperation
• After completing third stage, wash your hands with soap and running water
• Put on sterile gloves
• Prepare the sterile repair kit/set
• Empty the bladder; if unable, catheterize
• With assistance from other staff, draw and administer 10mls of 0.5%-1% lidocaine
• Clean the area with antiseptic solution
• Examine the incision/tear and determine the degree
• Place the sterile gauze in the vaginal opening near the incision. DO NOT PUSH THE
GAUZE INSIDE VAGINAL CANAL.
• Pick the needle holder and the suture-attached to the curved needle
• Start the repair about 1cm above the apex of the incision, using absorbable
sutures (i.e chromic- 2.0 or 3.0 or Polyglycolic); suture from inside and move out
• Continue suturing to the level of the vagina opening
• At the opening of the vagina:
o Bring together the cut edges of the vagina opening.
o Bring the needle under the vaginal opening and out through the incision and tie
• Close the perineum muscle using interrupted 2.0 absorbable sutures
• Close the skin by suturing under the skin/subcuticular (cosmetic scar) or using
interrupted sutures.
•
• Repair of Episiotomy
Episiotomy Care:
At the health facility
• Educate woman to keep the area dry and clean
• Regular/frequent change of sanitary pad
• Proper disposal of used sanitary pads
• Educate on general body and baby hygiene
• The woman and baby to stay in the health facility for a minimum of 24 hours following
delivery

26 | P a g e
At Home
• Woman to continue keeping the repaired episiotomy site clean and dry
• Educate to frequently change sanitary pads
• Proper disposal of used sanitary pads
• Encourage Sitz bath in luke-warm water with a bit of salt or antiseptic solution for 20 to
30 minutes 3 times a day for at least seven days.
• Encourage the woman to go back to the health facility within 2 days for check-up and
the first early post-natal care visit
Episiotomy Complications
HOWEVER
Some of the complications that may arise include;
1. Haematoma (collection of blood and fluid under the tissue at the site of episiotomy
Management:
• Remove sutures and drain when necessary
• For mild haematoma apply compression to drain or
• Aspirate when possible
• In the case of bleeding, check the source and take appropriate action (ligate,
pressure dressing)
o If there are no signs of infection and bleeding has stopped, reclose the
episiotomy if needed.
2. Infected episiotomy
Management:
• Open and drain the wound,
• Remove infected suture and debride the wound and
o If the infection does not involve deep tissues, give a combination of antibiotics
o Ampicillin 500mg orally ( 4 times a day for 5 days)
o Metronidazole 400mg orally (3 times per day for 5 days)
• If infection is deep, involves muscles and is causing necrosis (necrotizing), give a
combination of antibiotics until necrotic tissues have been removed and the woman
is fever-free for 48 hours.
o Ampicillin 2g iv q6hourly
PLUS
o Gentamicin 5mg/kg/body weight IV every 24 hours
Note: IF episiotomy and tear repair is done according to standard procedures, and the
care at home and health facilities carried out well, we do not foresee the complications.

27 | P a g e
PLUS
o Metronidozale 500mg IV every 8 hours
• Once the woman is fever-free for 48 hours
o Give ampicillin 500mg orally four
times per day for five days
PLUS
o Metronidazole 400mg orally – three time a day for 5 days
Retained Placenta
Is the failure of expulsion of the placenta 30 minutes after delivery of the baby.
If woman is not bleeding
• Empty bladder
• Encourage breast feeding, if appropriate
• Check if cervix is opened or closed
• If cervix is open, follow the steps for manual removal.
• Explain to the woman on the condition and the procedure you are going to perform
If the woman is bleeding, and the uterus is hard;
• Deliver placenta by controlled cord traction
• Insert IV line
IF placenta is not delivered in another 30 minutes (1 hour after delivery)
• Remove placenta manually
• Give appropriate IM/IV antibiotics
o Ampicillin 2gm IV plus Metronidozale 500mg IV, or
o Ceftriazone 1gm IV plus Metronidazole 500mg IV
Procedure for manual removal of placenta
Preparation
• Reassure and explain to the woman/husband/relatives on the condition including
action to be taken
• Perform blood grouping for T/C (Health center/Hospital)
• Insert IV line – if bleeding, give fluids rapidly/open rate.
• If not bleeding, give fluids slowly
• Assist woman to get on her back with knee flex
• Give diazepam 10mg IM/IV
• Clean vulva and perineal area
• Ensure the bladder is empty or catheterize if necessary
• Wash hands and forearms well and put on long sterile gloves, apron and gown.
Note: Necrotizing fasciitis requires wide surgical debridement. Perform delay
primary closure in two to four weeks (depending on resolution of the infection)
Give oxytocin, 10 IU IM. Do not give ergometrine for retained placenta because it
causes tonic uterine contraction, which may delay expulsion

28 | P a g e
Maintain aseptic techniques throughout the procedure.
Procedural Steps
• Hold the umbilical cord with clamp using none dominant hand
• Pull the cord gently until it is horizontal
• Gently insert dominant hand into the vagina (as you are looking at the woman’s face)
and up into the uterus
• Leave the cord and hold the fundus with none dominant hand in order to support the
fundus of the uterus and to provide counter-traction during removal
• Move the fingers of the hand sideways until the edge of the placenta is located
• Detach the placenta from the implantation site by keeping the fingers tightly together
and
• Using the edge of the hand to gradually make a space between the placenta and the
uterine wall
• Proceed slowly and gradually around the placenta bed until the placenta is detached
from the uterine wall
• Hold the placenta and slowly withdraw the hand from the uterus bringing the placenta
with it. With the other hand , continue to provide counter-traction to the fundus by
pushing it in the opposite direction that is being slowly withdrawn (this prevents
inversion of the uterus)
• Gently palpate the inside of the uterine cavity to ensure that all lobes and membranes
are completely removed.
• Make sure you check the completeness (lobes, membranes)
• If not completely removed, gently palpate inside of the uterine cavity again and
remove any fragments
• If not successful, refer immediately to the next level of care.
After successful manual removal of the placenta
• Explain to the woman on the outcome and continue management
• Give ergometrine 0.2mg IM (check B/P before giving; do not give if BP is 120/80 or
above).
• Then give 20U oxytocin in each litre of IV fluid and infuse at 125ml/hr x 24 hours
• Ask an assistant to massage the fundus of the uterus to encourage uterine contraction
• If heavy bleeding continues, repeat ergometrine 0.2mg IM (check B/P before giving; do
not give if BP is 120/80 or above) or prostaglandins
• Measure or estimate blood loss
Refer immediately to next level of care.
Note: If high fever, 38.5
◦
c or above, foul smelling lochia or history of ruptured membrane
for 18 or more hours, give Gentamycin 80mg IM , Ampicillin 2gram IV and metronidazole
500mg IV.

29 | P a g e
Retained placenta with closed cervix
At the clinic level
Explain to the woman/husband/relatives on the condition and action to be taken;
Monitor vital signs
Start IV ringer’s lactate/normal saline
Refer to the hospital
At Health Center Level
• Explain the condition to the woman/husband/relatives
• Maintain the IV fluid
• Continue checking vital signs
• Refer urgently to the hospital
At Hospital Level
• Continue with care received at health center level
• Maintain IV line
• Continue checking the vital signs
• Observe and check for bleeding
• Call the doctor urgently
DO NOT: exert excessive traction on cord
DO NOT: squeeze or push the uterus to deliver the placenta
Placenta accreta
If the placenta does not separate from the uterine surface by gentle side way movement of
the finger tips at the line of cleavage, suspect placenta accrete.
DO NOT persist in efforts to remove placenta. IF in the clinic, health center – Refer urgently
to hospital and IF in a hospital, urgently call the doctor
The care in the hospital will include the doctor using anesthesia
Note: Adhere to universal precaution/infection control
NOTE: IF hours or days have passed since delivery or if the placenta is retained due to
constriction ring or closed cervix, it may not be possible to put the hand in to the uterus.
Do not persist. REFER URGENTLY to Hospital.

30 | P a g e
Tear of Perineum, Vaginal or Cervix
• Examine the woman carefully and repair tear of the cervix or vagina (refer to episiotomy
and tear repair session after the removal of placenta or fragments
At the clinic level:
• Check for the tear and explain to the woman the action you are taking
• 1
st
and 2
nd
degree tear can be repaired at the facility
• 3
rd
and 4
th
degree tear explain to the woman as well as family members that you are
referring the woman for further management.
Before referral:
• Insert IV line and start fluid, preferably R/L or NS
• Monitor vital signs and record
At Hospital level
• Perform repair for 1
st
and 2
nd
degree tear
• 3
rd
and 4
th
degree, call for the doctor to repair under local anesthesia
• Reassure the family
Other procedures:
• Induction and Augmentation of Labor
Induction means:
• Stimulating the uterus to contract
Augmentation of labor means:
• Stimulating the uterus during labor to increase the frequency, duration and strength of
contractions
When to induce or Augment labor:
Augmentation of labor begins when:
• Less than 3 uterine contractions in 10 minutes each lasting less than 40 seconds when in
labor
• Delayed second stage of labor
Induction of labor is decided when there is:
• Post-term/post maturity
• Intra-Uterine fetal death (IUFD)
• Intra uterine growth restriction (IUGR)
• Early rupture of membrane
• Pre-eclampsia/eclampsia
Note: All cervical tears should also be repaired at the hospital.
NOTE: THIS PROCEDURE MUST BE DONE ONLY IN THE CEmONC FACILITY
The induction or augmentation of labor is based on partograph reading.

31 | P a g e
Contraindication for induction:
• CPD
• Previous C/S
• Grand Multiparous
• Malpresentation
Preparation for Induction and Augmentation of Labor
1. Explain and reassure the mother/husband/relatives on planned actions to be taken.
2. Set a tray:
• IV fluids – glucose, N/S or ringers lactate
• IV giving set/tubing
• Canula
• Adhesive tape
• Gloves (clean)
• Misoprostol 200mcg
• Oxytocin 10 IU
• Disposable sterile syringe
• Disposable needle
• Sterile Amniotic hook/gauze/cotton – korcher clamp
• Kidney dish – korcher clamp
• Watch or clock with a second hand reading
Procedure steps
• Ask the woman to empty bladder. If she cannot, insert a Foley catheter
Artificial Rupture of Membrane (ARM)- only for augmentation
Adhere to infection control measures
Listen to and record FHR
• Ask the woman to lie on her back with legs bent, feet together and knees apart
• Wearing sterile gloves, use one hand to examine the cervix and note the consistency,
the position, the effacement and dilation
• Use other hand to insert an amniotic hook or a korcher clamp into the vagina
• Guide the korcher clamp or amniotic hook towards the membrane along the fingers
in the vagina
• Place two fingers against the membranes and gently rupture the membrane using
the instruments in the other hand
• Allow amniotic fluid to drain slowly around the fingers
Note the color of the fluid (is it clear, greenish, bloody)
NOTE: Study has shown that Artificial Rupture of Membrane (ARM) is not required for
augmentation except in rare situation or need basis depending on advise of a doctor. It
is strongly discouraged.

32 | P a g e
If not clear, suspect fetal distress
• After ARM, listen to the FHR
• IF the FHR is abnormal (less than 100 or more than 180 beats/minute), suspect fetal
distress
• If good labor (3 uterine contractions in 10 minutes, each lasting more than 40
seconds) is not established 1 hour after ARM, begin oxytocin infusion
• If labor is induced because of severe maternal disease, example, sepsis or eclampsia,
begin oxytocin infusion at the same time as ARM
1. Oxytocin
Use oxytocin with great caution, as fetal distress can occur from hyper-stimulation and,
rarely, uterine rupture can occur. Multiparous women are at higher risk for uterine
rupture.
• Explain every step to the woman/husband/relative
• Monitor the woman’s vital signs (pulse, b/p) and contraction and
• Check the fetal heart rate
• Review for indications (refer to augmentation/induction notes)
• Ask the woman to lie on her left side and explain the reason to her
• Record on the partograph every 30 minutes
o Rate of infusion of oxytocin (Note: Changes in arm position may alter the
flow rate)
o Duration and frequency of contraction
o Fetal heart rate
• Listen every 30 minutes, always immediately after contraction
o If the FHR is less than 100 beats/minutes, stop the infusion and manage for fetal
distress
Management of Fetal Distress
• Prop-up the woman or place her on her left side
• Stop oxytocin, if it is being administered
• Give oxygen 4-6 liters by mask – nasal cannula
• If a maternal cause is identified, example, maternal fever, or drugs, initiate
appropriate management
• If a maternal cause is not identified and the fetal heart rate remains abnormal,
o Give IV fluids to improved placental perfusion (R/L 500ml or N/S 500ml)
o Perform a vaginal examination to check for explanatory signs of distress
Some possible causes of fetal distress
• Bleeding with intermittent or constant pain, suspect placenta abruption, ruptured
Note: In cases of HIV sero positivity and hepatitis, leave membrane intact for as long as
possible.
Important:
• Carefully observe women receiving oxytocin
• Women receiving oxytocin should never be left alone

33 | P a g e
uterus, vasa previa
• Drugs
• Dehydration
• Cord accident
• Infections (fever, foul smelling vaginal discharge)
• Treat appropriately based on the identified cause
Rate of Infusion of Oxytocin
• Infuse oxytocin 2.5 units in 500ml of dextrose or normal saline at 10 drops/minute
• Increase infusion rate by 10 drops/minute every 30 minutes until a good contraction
pattern is established (three contractions in 10 minutes, each lasting more than 40
seconds)
• Maintain this rate until delivery is completed
• If hyper -stimulation occurs (any contraction lasting longer than 60 seconds) or if
there are more than 4 contractions in 10 minutes, stop the infusion and relax the
uterus using tocolytics:
o MgSO4 4-6gm. Bolus IV over 20min then 1-2gm per hour (maximum 3gm per
hour) or Nifedipine 30mg oral loading dose then 10-20mg every 4-6 hours
• 1 liter IV fluids, normal saline or ringer’s lactate at 10 drops/minute
• If a good contraction pattern has not been established with the infusion rate at 60
drops/minute.
• Increase the oxytocin concentration to 5u in 500ml of dextrose or normal saline and
adjust the infusion rate to 30 drops/minute
• Continue to increase the infusion rate by 10 drops/minute every 30 minutes until a
good contraction pattern is established or a maximum rate of 60 drops/minute is
reached.
• If a good contraction pattern has still not been established using the higher
concentration of oxytocin:
In primigravida
• Infuse oxytocin at the higher concentration (10 units in 500ml) according to the
protocol (oxytocin infusion algorithm)
• If good concentrations are not established at the maximum dose, deliver by
caesarean section.
Obstructed /Labor Complication
Definition
Note: In oxytocin infusion, the maximum rate of drops is 60 drops/minute.
Do not go beyond.
If the woman is hypertensive and diabetics, administer oxytocin similarly in
Ringers Lactate
Note: Do not use oxytocin 10 units in 500ml for multi gravidas.
Do not use oxytocin for any woman with previous caesarean section

34 | P a g e
Obstructed labor is where there is poor or no progress of labor in spite of good
uterine contraction or a condition that arises at the time of labor attributed to the
mother or the baby and is characterized by lack of descent and slow dilation.
List of conditions/complications
• multiple pregnancy
• Malpresentation
• breech (foot/buttocks)
o transverse
o posterior position
o Large fetus
o Abnormal fetus
o face
• cord prolapse
• cord around the neck
• cord presentation
• cord entanglement
• shoulder dystocia
• contracted pelvis
• multiparity
• ineffective uterine contractions
• position of the placenta
• psychological condition of the mother
Some complications can be diagnosed during physical assessment.
These complications include:
• transverse lie (abdominal palpation)
• posterior position (PVE)
• cord presentation (PVE)cord prolapse (PVE – membrane rupture)
• breech (abdominal palpation)
• multiple pregnancy (abdominal palpation)
Transverse Lie:
• Do routine admission procedures at all levels
• Reassure and explain the findings to the woman/husband/relatives including action
to be taken at all levels
At clinic level
• Prepare the woman for referral
• IV line – ringer’s lactate/N/S
• Catheterize
• Prepare referral note
• Explain to the husband/relatives the urgency and need for 2 members of family to
accompany the woman to the hospital

35 | P a g e
• Assist the relatives to get an urgent means of transport
• Record the case in the register book
Health Center level
• Same Care as for clinic level PLUS
• Type and cross-match patient and relatives accompanying the woman to the hospital
Hospital Level
• Assess the woman
• Record findings
• Maintain IV line
• Maintain input and output records
• Check vital signs
• Call the doctor immediately
• Obtain consent from the next of kin for surgery
Pre-post-operative care
• Midwife escort/accompany during caesarean section
• Prepare to receive the baby
• Continue with routine care for both mother and baby
• Provide feedback to the family members
Cord Presentation
This condition is detected at time of vaginal examination by feeling the cord in front
while the membrane is intact.
• Reassure and explain the findings to the woman and her relatives
Clinic Level
• Prepare the woman for referral
• Set up IV line – ringer’s lactate or normal saline
• Check vital signs
• Assist the relatives to get an urgent transport
• Midwife and relatives must accompany the woman to the hospital
At the Health Center:
• Same Care as for clinic level PLUS
• Type and cross-match, Hemoglobin
• Continue checking the vital signs
• Maintain IV line
At the Hospital Level:
• Same Care as for health center level PLUS
• Obtain consent from family member
• Call Doctor immediately
• Continuous care will be based on the procedure performed by the doctor

36 | P a g e
Cord Prolapse:
Is the condition when the cord is visible outside the vagina, or can be felt below or
alongside the presenting part.
If Early Labor:
• Explain to the woman as well as the relatives the condition and the action planned to
be taken
• Perform vaginal examination to determine status of labor
• Check vital signs and record findings
• Check FHR
o If the baby is alive, cord pulsating
• Push the head or presenting part out of the pelvic brim with your hand on the
abdomen.
• Instill 500ml of normal saline into the bladder and tie or clamp the opening to keep
the presenting part up
Clinic and health center levels, Refer Urgently
Until caesarean section is performed at the hospital:
• Instruct an assistant (family, staff) to position the woman buttocks higher than the
shoulder while referring the woman to hospital.
• Insert fully catheter into the urether and instill 500ml of normal saline into the
bladder to keep the presenting part up and clamp/tie the end of the catheter, or
• Transport the patient in knee – chest position.
• If transfer is not possible, explain to the relatives and allow labor to continue
IF late labor (8cm and above):
IF it is TRANSVERSE LIE Refer Urgently for Caesarean section
For other presentations or conditions:
• Call for additional help if possible for mother and baby
• Prepare for newborn resuscitation
• Ask the woman to assume an upright or squatting position to help progress
• Expedite/hasten delivery by encouraging the woman to push with the contractions
IF Cord is not pulsating:
• Fetus probably dead
• Explain to the mother and family members that the baby is probably dead
• Offer counseling and emotional support
• Consult the doctor in the hospital for possible induction or caesarean section
Note: While transporting the woman, she has to lie on the mattress on her left side,
with pillows/blankets under her buttocks and legs to raise the feet higher than the
head/chest.

37 | P a g e
Breech
Is when the fetus’ buttock or feet are the presenting part.
In such a condition the woman and the family need to be told during the ANC visits the
importance of this woman delivering in the hospital.
How to detect breech presentation:
• During abdominal palpation at time of admission, fetal head is felt in fundus OR soft
body parts, legs or buttocks felt on vaginal examination.
Management:
IF early labor
At clinic and Health Centre Level
• Refer urgently to the hospital
• Reassure and explain to the family the reason for referral
If in advance labor,
• Do breech maneuver and deliver the baby.
At Hospital level
• Admit and manage the patient
Shoulder Dystocia
Is the condition that might happen once the head is delivered and restitution does not
take place naturally. The anterior shoulder fails to pass under the symphisis pubis and
instead becomes stuck. It often happens with big babies.
Shoulder Dystocia cannot be PREDICTED.
Management:
SHOUT FOR HELP
• Urgently mobilize available staff
• Encourage the woman to support and cooperate with the actions she will be
required to follow
• Ensure that the bladder is empty
• Perform adequate episiotomy to reduce soft tissue obstruction and allow space for
manipulation
• With the woman on her back, ask her to flex both thighs, bringing her knees as far up
as possible towards her chest
• Ask two assistants to push her flexed knees, firmly up toward her chest
• Wearing gynecological/long gloves, apply firm continuous traction downwards on
the fetal head to move the shoulder that is anterior, under symphysis pubis
Note: Avoid excessive traction on the head as this may result in brachial plexus
injury.

38 | P a g e
• Have an assistant simultaneously apply suprapubic pressure downward to assist
delivery of the shoulder.
IF the shoulder still is not delivered:
• Insert a hand into the vagina along the baby’s back
• Apply pressure to the shoulder that is anterior in the direction of the baby’s sternum
to rotate the shoulder and decrease the diameter of the shoulder
• IF needed, apply pressure to the shoulder that is posterior in the direction of the
sternum
• **IF the shoulder still is not delivered despite the above measures
o Insert a hand into vagina;
o Grasp the humerus of the arm that is posterior and keeping the arm flexed at the
elbow, sweep the arm across the chest. This will provide room for the shoulder
that is to move under symphysis pubis.
IF all of the above measures fail to deliver the shoulder, other options include:
• Fracture the clavicle to decrease the width of the shoulders
• Apply traction with a hook in the axilla to extract the arm that is posterior
Multiple Pregnancy
Is a condition associated with more than one fetus and the abdomen looks large.
Remember that you are expecting more than one baby. You need to prepare your trays
and other supplies to cater to the mother.
• Make sure you have an assistant
• Follow the delivery steps as indicated above considering the presenting part.
Management:
Points to remember:
After delivery of the first baby (using the steps as mentioned before)
• Palpate uterus immediately to determine the position and manage accordingly
• For oblique and transverse lie you can gently turn the baby
• Check the presenting part vaginally
• Await the return of strong contractions and spontaneous rupture of the second bag
of water usually within less than an hour
• Call Doctor for other variations
• Check for cord prolapse
• Continue monitoring the FHR
• Keep the mother warm
• When strong contractions continue, ask the woman to bear down.
• If weak contraction, augment with oxytocin
Follow the steps above for checking if there is another baby. If not
• Deliver the placenta and manage the third stage of labor
Note: Do not apply fundal pressure; this will further impact the shoulder and
can result in uterine RUPTURE

39 | P a g e
• Follow all the steps for any delivery.
DO NOT: Attempt to deliver the placenta until all babies are DELIVERED.
DO NOT: Give the mother oxytocin until after the birth of the last baby
Important:
Check the woman every 15 minutes for 4-7 hours and remember they have a greater
risk of having Post Partum Hemorrhage( PPH).
The woman MUST be advised and ENCOURAGED during ANC visits to go to the
hospital for delivery. Discuss the reasons with the couple.
Pre-Term
Pre-Term Labor:
Is when there is uterine contraction before the viability of the fetus or before 37 weeks
of gestation.
Pre-term delivery is associated with higher perinatal morbidity and mortality.
Management:
• If less than 36 weeks gestation, give corticosteroids to the mother to improve fetal
lung maturity and chances of neonatal survival:
o Dexamethasone 12 mg IM, two doses 24 hours apart; OR
o 6 mg IM, four doses 12 hours apart.
• Baby should be referred to the appropriate center for proper care.
• Follow instructions for neonatal resuscitation as necessary
• Ensure that the baby is kept warm. Wrap the baby in a soft, dry cloth, cover with a
blanket and ensure the head is covered to prevent heat loss.
• Institute kangaroo mother care with mother or available family member.
If maternal history indicates possible bacterial infection, give first dose of antibiotics to
the baby: Gentamicin 4mg/kg body weight IM AND Ampicillin 50mg/kg body weight IM.
If the baby is cyanotic (bluish) or is having difficulty breathing (less than 30 or more than
60 breaths per minute, chest in drawing or grunting) give oxygen by nasal
catheter/prongs
Assisted Deliveries
Vacuum Extraction
Vacuum Extractor: A tool used to help in the delivery of baby presenting cephalic when
the mother has difficulty pushing it out.
Explain procedures to mother and family members.
The mother must have a term pregnancy, the cervix must be fully dilated, fetus must
present vertex
Head must be at least 2/5 or less palpable above symphysis pubis
NOTE: Make every effort to confirm the gestational age of the fetus.
Note: Corticosteroids should not be used in the presence of infection.
40 | P a g e
Procedures:
• Check all connections and test the vacuum on a gloved hand
• Provide emotional support and encouragement
• Wearing a sterile glove, assess the position of the fetus head by feeling the sagittal
suture line and the fontanelles
• Identify the posterior fontanelle
• Apply the largest cup that will fit with the center of the cup over the flexion point
1cm anterior or the posterior fontanelle. This placement will promote flexion,
descent and auto rotation with traction
• An episiotomy may be needed for proper placement at this time
• Check the application. Ensure there is no maternal soft tissue (cervix or vagina)
within the rim
• With the pump, create a vacuum of 0.2kg/cm
2
negative pressure and check the
application
• Place bullets on each point below
• Increase the vacuum to 0.8kg/cm
2
and check the application
• After maximum negative pressure, start traction in the line of the pelvic axis and
perpendicular to the cup. If the fetal head is tilted to one side or not flexed well,
traction should be directed in a line that will try to correct the tilt or deflexion of the
head (i.e. to one side or the other, not necessarily in the midline)
• With each contraction, apply traction in a line perpendicular to the plane of the cup
rim. Place a finger on the scalp next to the cup during traction to assess potential
slipping and descent of the vertex.
Applying Traction
TIPS
• Never use the cup to actually rotate the baby’s head.
• Rotation of the baby’s head will occur with traction
• The first pull helps to find the proper direction for pulling
• With progress and in the absence of fetal distress, continue the ‘guiding’ pulls for a
maximum of 30 minutes
Failure
Vacuum extraction is considered failed if the:
DO NOT CONTINUE TO PULL BETWEEN CONTRACTION AND EXPULSIVE EFFORTS

41 | P a g e
• Fetal head does not advance with each pull
• Fetus is undelivered after three pulls with no descent or after 30 minutes.
• Do not continue to pull. Call the doctor.
COMPLICATIONS
Complications usually result from not observing the condition of application or from
continuing efforts beyond 30 minutes.
FETAL COMPLICATIONS
• Localized scalp edema (caput succedaneum) under the vacuum cup is harmless and
disappears in a few hours
• Cephalohaematoma requires observation and usually will clear in three or four
weeks
MATERNAL COMPLICATIONS
• Tear of the genital tract may occur. Examine the woman carefully and repair any
tears to the cervix or vagina or episiotomy
Emergency Obstetric Care
This is urgent medical and surgical care given to a woman for problems related to
pregnancy, labor, delivery and the pueperium. The purpose is to appropriately manage
obstetric complications and conditions likely to cause morbidity, injury or death to the
mother, the fetus or both mother and fetus/newborn. Because most of the obstetric
complications are unforeseeable, rapid intervention is required.
Requirement for Provision of EmONC
• Trained staff
• Fully equipped health facility including functional laboratory
• Functioning operating theater
• Blood bank or blood transfusion facilities
• Drugs and supplies necessary to deal with medical emergencies
• Roadworthy ambulance
• Functioning communication (e.g radio, phone, accessories)
Emergency Obstetric Care is divided into two categories:
o Basic Emergency Obstetric and Newborn Care ( BEmONC)
o Comprehensive Emergency Obstetric and Newborn Care (
CEmONC)
BEmONC Components
• Parenteral antibiotics
• Parenteral oxytocin
• Parenteral anticonvulsants
• Manual removal of retained placenta segments
• Removal of retained products of conception (using Manual Vacuum Aspiration -
MVA)
• Assisted virginal delivery (vacuum extraction)
• Care of the Newborn

42 | P a g e
o Newborn Resuscitation
o Keeping the baby warm
CEmONC Components
• Parenteral antibiotics
• Parenteral oxytocin
• Parenteral anticonvulsants
• Manual removal of retained placenta segments
• Removal of retained products of conception (using Manual Vacuum Aspiration -
MVA)
• Assisted virginal delivery (vacuum extraction)
• Care of the Newborn
o Newborn Resuscitation
o Keeping the baby warm
• Safe blood transfusion
• C/section
INFECTION, PREVENTION AND CONTROL
Infection Prevention and Control (IPC) SOPs and standards must be followed at all times
during service provision. This should be implemented at all levels of the health care delivery
system. The intent is to ensure that IPC practices are institutionalized at all levels. The MOH
approved IPCs standards include:
• The keep safe/keep serving modules on universal precautions, safe maternity
practices and safe work environment
• Triage
• Isolation and referral
• PPE, both basic and enhanced as appropriate
• Waste management and disposal
